레이블이 game maker sudio인 게시물을 표시합니다. 모든 게시물 표시

2019년 8월 18일 일요일

GMS2 Room Transition (룸 전환 효과)


Room Transition 입니다.
최종 구현은 아래 gif 이미지 참고 바랍니다.
ROOM이 여러개 존재하고 Room이동시 이전 룸 화면과 새로운 룸의 화면이 겹치는 방식입니다. 구현을 위해서는 surface를 사용하게 됩니다.


전체 구조는 아래와 같습니다.

Sprites

sRoomChange : Player가 충돌되었을때 RoomChange 가 일어나는데 충돌이 되는 이미지
sPlayerIdle : Player의 이미지
stext : room0를 표기하기 위해 사용하는 이미지
stext1 : roomR을 표기하기 위해 사용하는 이미지
stext2 : roomL을 표기하기 위해 사용하는 이미지

Scripts

EaseOutQuad 함수 https://easings.net/ 여기 참고 바랍니다.
/// EaseOutQuad(inputvalue,outputmin,outputmax,inputmax)
argument0 /= argument3;
return -argument2 * argument0 * (argument0 - 2) + argument1;

Objects

oRoomTransitionSMLeft 

Left로 이동 효과를 나타내는 object
persistent 이 값은 Room이 종료되더라도 남아있게 하기 위한 용도입니다.
만약 room 효과가 완전히 완료 되었을때 수동으로 종료가 필요합니다.
maxframes 값은 최대 frame수를 결정합니다. 숫자가 커질 수록 전환이 늦어집니다.
Create
/// @description Insert description here
// You can write your code in this editor
currentframe = 0
maxframes = 20

persistent = true; // when changing room keep this object alive

// copy the old room so we can display it on the second room
sur_oldroom = surface_create(surface_get_width(application_surface),surface_get_height(application_surface));
surface_copy(sur_oldroom,0,0,application_surface)

room_persistent = false;

Destory
/// @description Insert description here
// You can write your code in this editor
surface_free(sur_newroom)
surface_free(sur_oldroom)

moveobject.x = movex;
moveobject.y = movey;
moveobject.facing = movefacing;
destory 될때 특정 object를 특정한 위치에 이동 시키고자 할때 사용합니다.  facing은 여기에서는 특별한 의미로 사용되고 있지는 않지만 의도는 캐릭터의 방향을 전달하기 위한 목적입니다.

Step
currentframe++

if (currentframe > maxframes) {
    instance_destroy() // The transition has finished so destroy it
}


// We are now on the second room so record that room. 
if (currentframe == 2) { 
 moveobject.x = movex;
 moveobject.y = movey;
 moveobject.faceing = movefacing;
}
if (currentframe == 3) { 
    sur_newroom = surface_create(surface_get_width(application_surface),surface_get_height(application_surface));
    surface_copy(sur_newroom,0,0,application_surface)
}
frame이 3일때는 새로운 room 이 준비가 되었을것이므로 surface 를 복사합니다.

Draw GUI
if (currentframe > 2) {

    // convert the number of frames that have passed into a number between 0 and the room width
    var slideamount = EaseOutQuad(currentframe,0,surface_get_width(application_surface),maxframes)

    if (surface_exists(sur_oldroom)) {
        draw_surface(sur_oldroom,+slideamount,0)
    }

    if (surface_exists(sur_newroom)) {
        draw_surface(sur_newroom,-surface_get_width(application_surface)+slideamount,0)
    }
}


/// I do this to hide the flicker where the next room pops up for 1 frame 
if (currentframe <= 2 ) { 
    if (surface_exists(sur_oldroom)) {
        draw_surface(sur_oldroom,0,0)
    }
}
Draw GUId에서는 sur_oldroom, sur_newroom를 이용해서 적절히 복사하는 과정입니다. 이때 EaseOutQuad 함수를 이용하게 됩니다.

oRoomTransitionSMRight

Right로 이동 효과를 나타내는 object
Left와 거의 동일하나 Draw GUI 부분이 약간 다릅니다.
Create
/// @description Insert description here
// You can write your code in this editor
currentframe = 0
maxframes = 20

persistent = true; // when changing room keep this object alive

// copy the old room so we can display it on the second room
sur_oldroom = surface_create(surface_get_width(application_surface),surface_get_height(application_surface));
surface_copy(sur_oldroom,0,0,application_surface)

room_persistent = false

Destory
/// @description Insert description here
// You can write your code in this editor
surface_free(sur_newroom)
surface_free(sur_oldroom)
moveobject.x = movex;
moveobject.y = movey;
moveobject.facing = movefacing;

Step
currentframe++

if (currentframe > maxframes) {
    instance_destroy() // The transition has finished so destroy it
}


// We are now on the second room so record that room. 
if (currentframe == 2) { 
 moveobject.x = movex;
 moveobject.y = movey;
 moveobject.faceing = movefacing;
}
if (currentframe == 3) { 
    sur_newroom = surface_create(surface_get_width(application_surface),surface_get_height(application_surface));
    surface_copy(sur_newroom,0,0,application_surface)
}

Draw GUI
if (currentframe > 2) {

    // convert the number of frames that have passed into a number between 0 and the room width
    var slideamount = EaseOutQuad(currentframe,0,surface_get_width(application_surface),maxframes)

    if (surface_exists(sur_oldroom)) {
        draw_surface(sur_oldroom,-slideamount,0)
    }

    if (surface_exists(sur_newroom)) {
        draw_surface(sur_newroom,surface_get_width(application_surface)-slideamount,0)
    }
}


/// I do this to hide the flicker where the next room pops up for 1 frame 
if (currentframe <= 2) { 
    if (surface_exists(sur_oldroom)) {
        draw_surface(sur_oldroom,0,0)
    }
}


oPlayer


Step
var kLeft, kRight, kUp, kDown;

kLeft        = keyboard_check(vk_left)  || gamepad_axis_value(0, gp_axislh) < -0.4;
kRight       = keyboard_check(vk_right) || gamepad_axis_value(0, gp_axislh) >  0.4;
kUp          = keyboard_check(vk_up)    || gamepad_axis_value(0, gp_axislv) < -0.4;
kDown        = keyboard_check(vk_down)  || gamepad_axis_value(0, gp_axislv) >  0.4;

if( kLeft ){
 x = x - 4;
}

if( kRight ){
 x = x + 4;
}

if( kUp ){
 y = y - 4;
}

if( kDown ){
 y = y + 4;
}
키를 누르면 object를 이동 시킵니다.

oRoomChange

충돌 oPlayer
// have to set
//dir : "Left" "Right"
//moveobject;
//movex;
//movey;
//movefacing;
//gotoroom

room_persistent = false;
var inst;
if(dir=="Left"){
 inst = instance_create_layer(0,0,"Instances",oRoomTransitionSMLeft);
}else{
 inst = instance_create_layer(0,0,"Instances",oRoomTransitionSMRight);
}

inst.moveobject = moveobject;
inst.movex = movex;
inst.movey = movey;
inst.movefacing = movefacing;
room_goto(gotoroom)

미리 아래값을 설정해 두어야 합니다. 그렇지 않으면 오류가 발생합니다.
해당값은 room instance를 더블클릭하여 설정합니다.
//dir : "Left" "Right"
//moveobject;
//movex;
//movey;
//movefacing;
//gotoroom


Rooms

room0


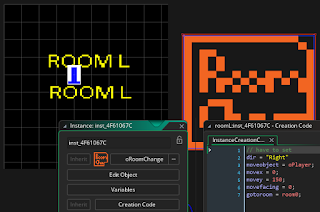
room0 좌우측에 oRoomChange 를 배치합니다.
그리고 oRoomChange 를 각각 더블 클릭하여 Creation Code를 입력합니다.
우측은 다음과 같습니다.
// have to set
dir = "Right"
moveobject = oPlayer;
movex = 0;
movey = 150;
movefacing = 0;
gotoroom = roomR

좌측은 다음과 같습니다.
// have to set
dir = "Left"
moveobject = oPlayer;
movex = 300;
movey = 150;
movefacing = 0;
gotoroom = roomL;

roomR

roomR에서는 좌측에만 oRoomChange 가 존재하며 초기 코드는 아래와 같습니다. 좌측으로 이동하면 이동하는곳은 room0이어야 합니다.


// have to set
dir = "Left"
moveobject = oPlayer;
movex = 300;
movey = 150;
movefacing = 0;
gotoroom = room0;


roomL

roomL에서는 오른쪽에만 oRoomChange가 있습니다.

// have to set
dir = "Right"
moveobject = oPlayer;
movex = 0;
movey = 150;
movefacing = 0;
gotoroom = room0;


2019년 8월 4일 일요일

GMS2 적 움직임 만들기 state machine이용 ( enemy movement with state machine )


서론

이번에 만드는 최종 내용은 아래 이미지입니다.  플래폼 게임에서 총알을 발사하는 적이 이번에 만들 내용입니다. (with GMS2)


알아야 할것


Solid

플래폼게임에 있어서 바닥이 되는 object를 solid라고 표현합니다. 바닥으로는 점프할때 부딧히기도 하면 이것은 벽이 되기도 합니다.
여기에서는 oParSolid 라는 object가 바닥을 나타냅니다.

State machine(상태 기계)

적의 움직임에서 State는 총쏘기 움직이기 등으로 나뉩니다. 이 움직임을 구현하기 위해서는 매 프래임(Step) 마다 들어올때 적절한 상태(State)를 변화를 시키게 되는데 이것을 상태 기계라고 불립니다.


sprites & resource


sprites에는 플랫폼 블럭이 필요하고 적이미지(idle일때와 걸어 다닐때 이미지) 총알 sprite모두 4가지를 준비하였습니다.

room0

room에는 적과 플랫폼이 되는 블럭 하나만 올려두었습니다.


Objects


oParSolid


물체가 이동하지 못하게 하는 용도로 여기에서는 이미지를 block 형태로 사용하였고 특별한 코드는 없습니다.

oEBullet


적이 쏘는 총알에 대한 object입니다. 여기도 특별한 코드는 없고, 총알의 이미지만 있습니다.

oParBullet


oEBullet의 부모가 됩니다. 여기에는 Outside View 에 대한 이벤트 코드인 화면벗어날때 객체를 소멸하는 코드만 들어있습니다. 이렇게 되면 oEBullet 에 상속이 되어 적용됩니다. 여러 종류의 총알을 만들기 위한 용도이나 여기 예제에서는 하나밖에 없습니다.

oAlienSectoid2


핵심이 되는 외계인 object입니다. 기본적인 코드들은 다른 platformer 소스에서 가져와서 정확한 출처는 알 수가 없고 제가 작업한 부분은 state machine 되는 부분만 작업을 하였습니다. Destroy이벤트는 특별한 내용이 없습니다.

코드 설명

Create

// HP
max_hp = 30
hp = max_hp

// Movement
groundAccel = 0.03;//1.00;
groundFric  = 0.05;//2.00;
airAccel    = 0.5;//0.75;
airFric     = 0.05;//0.01;
vxMax       = 1.0;//5.50;
vyMax       = 8;//10.0;
jumpHeight  = 6.00;
gravNorm    = 0.25;//0.50;
gravSlide   = 0.15;//0.25; 

// Velocity
vx = 0;
vy = 0;

platformTarget = 0

facing = 1

state = SM_WALK
need_to_change_state = true

state_count = 0;
state_count_max = 30;
state_save = -1;
max_hp, hp 값은 체력을 표시하기 위한 용도인데 이 예제에서는 사용하지 않습니다.
// Movement 와 Velocity 부분은 플랫폼 소스에 기본 예제로 있던 부분입니다. 간략하게 설명드리자면  Movement값은 object의 움직임에 대한 parameter로 사용합니다. 점프는 얼마나 할지, 움직임의 최대속도는 얼마가 되는지 가속도는 얼마가 되는지를 설정하게 됩니다.
vx, vy 는 해당 object의 속도를 나타냅니다. Step단에서 속도가 정해지면 EndStep에서 움직임 거리 x,y를 계산해 냅니다.
platformTarget은 이 object가 상대편 과 부딧혔을때의 고유 id 정보가 넘어오게 됩니다.
facing은 이미지를 flip 시키기 위한 용도로 사용합니다. 1,-1 값을 지닙니다.
state : state machine의 가장 중요한 상태값입니다. 넣는값은 scripts macro안에 있습니다.
need_to_change_state 가 true가 되면 다음 step에 state가 변경됩니다.
state_count 기본적으로 state는 일정 시간 후에 자동으로 변경되는데 이 값을 count 하기 위한 값이며, 해당 값이 state_count_max 가 되면  need_to_change_state 값이 true가 되되록 되어있습니다.
state_save 는 임시로 저장된 이전 state 값입니다.

Begin Step

/// @description Insert description here
// You can write your code in this editor

onGround = OnGround();

cLeft  = place_meeting(x - 1, y, oParSolid); 
cRight = place_meeting(x + 1, y, oParSolid);

dRight = !((place_meeting(x+sprite_width+1,y+1,oParSolid)));
dLeft = !((place_meeting(x-sprite_width-1,y+1,oParSolid)));
onGround는 object가 플랫폼 위에 있는지 검사합니다. 만약 해당 값이 false이면 하늘이 떠있는것입니다. 그렇다면 아래로 떨어지는 구현이 필요합니다.
cLeft, cRight는 각각 왼쪽 오른쪽에 객체를 넣을 수 있는지 점검 합니다. 즉 옆에 벽이 있는지 점검합니다. 벽이 있는 경우 못가도록 처리가 필요합니다.
dRight, dLeft는 각각 오른쪽 왼쪽 하단에 현재의 object가 떨어질 수 있는지 확인합니다. 해당 값이 true가 되면 그 쪽으로 가면 onGround가 false가 되면서 떨어지게 될것입니다. 이것을 그림으로 표시해보면 아래와 같습니다.


Step

var prev_state = state;
// 상태가 변경해야하는 시점이 되면 상태를 결정하도록 합니다.
if( need_to_change_state ){
 // change state
 // last state
 // change the state as the last state
        // 여기 코드는 다음 상태를 결정하도록 한다.
 switch(state){
  case SM_WALK:
  case SM_WLKR:
  case SM_WLKL:
   state = SM_FIRE
  break;
  case SM_JUMPDOWN:
  case SM_JUMP:
   state = choose(SM_WALK,SM_FIRE)
  break;
  case SM_STAY:
   state = choose(SM_WALK,SM_FIRE)
  break;
  case SM_FIREWAIT:
  case SM_FIRE:
   state = SM_WALK
  break;
 }
 
 // enter state for init code
        // 상태가 변경되자마자 처리해야할 코드들이다. 보통 초기화 코드가 들어갑니다.
 speed = 0
 direction = 0
 state_count = 0
 switch(state){
  case SM_WALK:
   state_count_max = 90
   if( state_save!=SM_WALK && state_save != -1 ){
    state = state_save;
   }else{
    // random
    if (choose(1,2)==1) { 
     state = SM_WLKR;
    }else{
     state = SM_WLKL;
    }
   }
  break;
  case SM_JUMP:
   state_count_max = 120
  break;
  case SM_STAY:
   state_count_max = 30
  break;
  case SM_FIRE:
   state_save = prev_state;
   state_count_max = 10
  break;
 }
 
 need_to_change_state = false
}


// Apply the correct form of acceleration and friction
if (onGround) {  
    tempAccel = groundAccel;
    tempFric  = groundFric;
} else {
    tempAccel = airAccel;
    tempFric  = airFric;
}


// 상태에 따른 처리입니다.
// action
state_count++;
if(state==SM_WLKL || state==SM_WLKR){
 // Left 
 if (state==SM_WLKL) {
     facing = -1;
     // Apply acceleration left
     if (vx > 0)
         vx = Approach(vx, 0, tempFric);   
     vx = Approach(vx, -vxMax, tempAccel);
  if( cLeft || dLeft) {
   vx = 0;
   state=SM_WLKR;
  }
 // Right
 } else if (state==SM_WLKR) {
     facing = 1;
     // Apply acceleration right
     if (vx < 0)
         vx = Approach(vx, 0, tempFric);   
     vx = Approach(vx, vxMax, tempAccel);
  if( cRight || dRight ) {
   vx = 0;
   state=SM_WLKL;
  }
 }
 
}


// Jump 
if (state==SM_JUMP) { 
    if (onGround) {
     vy = -jumpHeight;
    }else{
  state=SM_JUMPDOWN
 }
}
if (state==SM_JUMPDOWN) {
 if (onGround) {
  need_to_change_state = true;
 }
}

if (state==SM_STAY) {
}

if (state==SM_FIRE) {
 if( state_count > state_count_max ){
  var obj = instance_create_layer(x,y,"Instances",oEBullet);
  var dir = 0;
  if( facing == -1 ) dir = 180;
  else dir = 0; 
  with(obj){
   speed     = 5;
   direction = dir;
  }
  state_count = 0;
  vx = 0;
  state=SM_FIREWAIT;
 }
}

if( state_count > state_count_max ) need_to_change_state = true;
// 중력 처리입니다.
// Handle gravity
if (!onGround) {
    vy = Approach(vy, vyMax, gravNorm);
}


End Step


if (vy < 1 && vy > -1)
    PlatformCheck();
else
    repeat(abs(vy)) {
        if (!PlatformCheck())
            y += sign(vy);
        else
            break;
    }

repeat(abs(vx)) {
    if (place_meeting(x + sign(vx), y, oParSolid) && !place_meeting(x + sign(vx), y - 1, oParSolid))
        y -= 1;
         
    if (place_meeting(x + sign(vx), y + 2, oParSolid) && !place_meeting(x + sign(vx), y + 1, oParSolid))
        y += 1;
      
    if (!place_meeting(x + sign(vx), y, oParSolid))
        x += sign(vx);
    else
        vx = 0;
}


Draw

switch(state){
 case SM_WALK:
 case SM_WLKR:
 case SM_WLKL:
  sprite_index = sAlienSectoidRun;
 break;
 case SM_JUMPDOWN:
 case SM_JUMP:
  sprite_index = sAlienSectoidIdle
 break;
 case SM_STAY:
  sprite_index = sAlienSectoidIdle
 break;
 case SM_FIREWAIT:
 case SM_FIRE:
  sprite_index = sAlienSectoidIdle;
 break;
}

//if( oPlayer.x > x ) facing = -1
//else facing = 1

draw_sprite_ext(sprite_index, image_index, x, y, facing * 1, 1, image_angle, c_white, image_alpha);

if(hp<max_hp){
 var my = (sprite_height/2+(sprite_height/2)*(1/4))
 var mx = (sprite_width/2)-(sprite_height/2)*(1/4)
 draw_healthbar(x-mx,y-my-4,x+mx,y-my,(hp/max_hp)*100,c_black,c_red,c_green,0,true,true)
}

Scripts

macro

#macro SM_WALK 10
#macro SM_WLKL 11
#macro SM_WLKR 12
#macro SM_JUMP 20
#macro SM_JUMPDOWN 21
#macro SM_STAY 30
#macro SM_FIRE 40
#macro SM_FIREWAIT 41

Approach

/// @description  Approach(start, end, shift);
/// @param start
/// @param  end
/// @param  shift

if (argument0 < argument1)
    return min(argument0 + argument2, argument1); 
else
    return max(argument0 - argument2, argument1);

OnGround

/// @description  OnGround();

return place_meeting(x, y + 1, oParSolid);

PlatformCheck

/// @description  PlatformCheck();

var collision = instance_place(x, y + sign(vy), oParSolid);

if (collision) {
    if (vy >= 0) {
        platformTarget = collision;
    } else {
        // Platform above
        vy = 0;
    }
    return true;
}

if (vy < 0) {
    platformTarget = 0;
}

if (instance_exists(platformTarget)) {
    if (platformTarget) {
        if (place_meeting(x, y + 1, platformTarget) && !place_meeting(x, y, platformTarget)) {
            //Platform below
            vy = 0;
            return true;
        } else
            platformTarget = 0;
    }
} else
    platformTarget = 0;
    
platformTarget = 0;
return false;


2019년 6월 29일 토요일

GMS2 ZUI making Sprite Button like shop in Android, ZUI에 Sprite 버튼 추가해서 상점 비슷하게 만들기


앞에서 ZUI를 이용하여 Android 기본 사용을 위한 패치를 해봤습니다.

https://swlock.blogspot.com/2019/06/gms2-zui-in-android-zui.html

이번에는 간단하게 상점을 구현하기위한 버튼을 만들것입니다. 대단한것은 아니고, Sprite 버튼이 여러개 있으면 상점처럼 사용 할 수 있을것 같아서 구현 하였습니다.

objUIButton 생성하는곳에서 caption에 특수 문자인 \x01을 넣어주면 이미지가 있다는것을 알리게되고,  caption_ext 에는 SPR은 sprite를 의미하고, 두번째 인자는 어떤 sprite인지, 마지막으로 image index 숫자가 됩니다.
 with (zui_create(12, 38, objUIButton)) {
  zui_set_anchor(0, 0);
  zui_set_size(120, 32);
  caption = "1/10 \x01";
  caption_ext = "SPR,sprConti,0|SPR,sprThree,0"
  callback = test_callback_button;
 }

 with (zui_create(12, 38+32, objUIButton)) {
  zui_set_anchor(0, 0);
  zui_set_size(120, 32);
  caption = "1/10 \x01";
  caption_ext = "SPR,sprThree,0"
  callback = test_callback_button;
 }

objUIButton의 Create 이벤트에 아래 내용을 추가합니다.
caption = ""
caption_ext = 0

objUIButton의 Draw 이벤트에도 아래 내용을 추가합니다.  caption_ext에 값이 있으면 caption을 파싱해서\x01 부분을 찾아서 그림으로 대체합니다.
if( caption_ext==0 )
 draw_text(__width * 0.5, __height * 0.5, string_hash_to_newline(caption));
else{
 ui_draw_text_and_sprite(__width * 0.5, __height * 0.5,caption,caption_ext,1,1,1)
}

ui_draw_text_and_sprite 이것은 스크립트 입니다.
///@desc 텍스트와 스프라이트를 그림
///@args x x위치
///@args y y위치
///@args __str__ 출력할문자열
///@args caption_ext
///@args alpha 투명도
///@args x_scale 가로배율
///@args y_scale 세로배율


//text 그릴 x,y위치
var X = argument[0];
var Y = argument[1];
var startx=X;
var starty=Y;
//문자열
var STR = argument[2];
var EXT = argument[3];
var ALPHA = argument[4];

//말풍선의 배율
var XS = argument[5];
var YS = argument[6];

//줄마다의 공백픽셀
var line_empty = 8;
var theight = string_height(" ");
var lheight = string_height(" ");
var twidth = string_width(" ");
var len = string_byte_length(STR);
var extdata = string_split_2(EXT,"|",",")
var extindex = 0

var maxstartx = 0, maxstarty = 0;
//좌표 먼저 계산
startx=0;
starty=0;
for( var i = 1 ; i <= len ; i++ ){
 var s_char = string_char_at( STR , i );
 if(s_char=="\n"){
  starty = starty+lheight;
  lheight = string_height(" ");
  if( maxstartx < startx ) maxstartx = startx
  startx = 0;
  continue;
 }else if(s_char=="\x01"){
  if(extdata[extindex]=="SPR"){
   extindex = extindex+1;
   var spr = asset_get_index(extdata[extindex]);
   extindex = extindex+1;
   var frn = real( extdata[extindex] );
   extindex = extindex+1;
   if ( sprite_exists( spr ) )
   {
    twidth = sprite_get_width( spr ) * XS;
    theight = sprite_get_height( spr ) * YS;
    //if( lheight < theight){
    // lheight = theight;
    //}
    startx = startx + twidth;
    if( maxstartx < startx ) maxstartx = startx
   }
  }
  continue;
 }
 twidth = string_width(s_char) * XS;
 theight = string_height(s_char) * YS;
 if( lheight < theight){
  lheight = theight;
 }
 startx = startx + twidth;
 if( maxstartx < startx ) maxstartx = startx
}
maxstarty = starty + lheight


// DRAW

draw_set_halign(fa_left);
draw_set_valign(fa_top);
extindex = 0

X=X-(maxstartx)/2;
Y=Y-(maxstarty)/2;

startx=X;
starty=Y;
lheight = string_height(" ");
for( var i = 1 ; i <= len ; i++ ){
 var s_char = string_char_at( STR , i );
 if(s_char=="\n"){
  starty = starty+lheight;
  lheight = string_height(" ");
  startx = X;
  continue;
 }else if(s_char=="\x01"){
  if(extdata[extindex]=="SPR"){
   extindex = extindex+1;
   var spr = asset_get_index(extdata[extindex]);
   extindex = extindex+1;
   var frn = real( extdata[extindex] );
   extindex = extindex+1;
   if ( sprite_exists( spr ) )
   {
    twidth = sprite_get_width( spr ) * XS;
    theight = sprite_get_height( spr ) * YS;
    //if( lheight < theight){
    // lheight = theight;
    //}
    //스프라이트 그리기
    draw_sprite_ext( spr , frn , startx , starty , XS , YS , 0 , c_white , ALPHA); 
    startx = startx + twidth;
   }
  }
  continue;
 }

 twidth = string_width(s_char) * XS;
 theight = string_height(s_char) * YS;
 if( lheight < theight){
  lheight = theight;
 }

 /* 문자 그리기 */
 draw_text_transformed( startx , starty , s_char , XS , YS, 0);
 startx = startx + twidth;
}

그리고 아래는 해당 스크립트에서 문자열을 분리하기 위한 string_split, string_split_2 가 있습니다.
string_split_2
입력 : "SPR,sprConti,0|SPR,sprThree,0" , "|", ","
출력 : 
result[0]="SPR"
result[1]="sprConti"
result[2]="0"
result[3]="SPR"
result[4]="sprThree"
result[5]="0"
///@desc string_split_2(string,seperator1,seperator2)
///@args string
///@args seperator1
///@args seperator2
var str = argument0 
var seperator1 = argument1
var seperator2 = argument2
var sep1 = string_split(str,seperator1)
var sep2;
var ret=array_create(0);
var size = array_length_1d(sep1);

for(var i = 0 ; i < size ; i++ ){
 sep2 = string_split(sep1[i],seperator2)
 array_copy(ret,array_length_1d(ret),sep2,0,array_length_1d(sep2))
}

return ret;

string_split
입력 : "abc:def:ghijk",":" 입력시 
출력 : 
result[0]="abc"
result[1]="def"
result[2]="ghijk" 
///@desc string_split(string,seperator)
///@args string
///@args seperator

var count = 0;
var result;

result[0] = argument0;

while (true) {
 var position = string_pos(argument1, result[count]);
 
 if (position <= 0)
  break;
 
 result[count + 1] = string_copy(result[count], position + 1, string_length(result[count]) - position);
 result[count] = string_copy(result[count], 1, position - 1);
 
 count++;
}

return result;


굉장히 복잡하긴 하지만 먼저 line수와 글자를 계산해서 중심점을 찾아내게 됩니다. 그리고 실제 text 그릴때 중심점을 기준으로 text를 draw하게 됩니다. 여기서 주의할점은 image의 위치의 상대 주소는 left top 기준으로 하여야하며 이미지 가로는 고려하여 중심점을 잡지만, 이미지가 아무리 크더라도 세로는 중점을 계산하지 않았습니다. 이 부분은 몇가지 예제를 살펴보면 쉽게 이해가 될것 같습니다.
코드는 위 내용이 전부입니다.

위 예제에서 아래와같\x01이 하나 임에도 대응되는 SPR데이터를 2개 넣어둔것은 잉여 데이터가 있더라도 오류가 발생하지 않음을 보여준 예제 입니다.
  caption = "1/10 \x01";
  caption_ext = "SPR,sprConti,0|SPR,sprThree,0"

16*16 이미지를 빨강색, 파란색 사각형으로 구현한 실행화면은 아래와 같습니다.

빨강색 사각형을 32*32로 표기하면 다음과 같이 됩니다.세로는 중점이 안맞는 현상이 나타납니다. 이것은 큰 그림에 많은 설명을 붙여서 기록하는 방식을 사용하기 위한 의도된 동작입니다. 윈도우가 벗어나는것처럼 표시된것은 버튼 생성시 윈도우 크기를 좀 더 키우면 됩니다.


지금까지 작업한 소스 입니다.
https://drive.google.com/open?id=1lCBh0uOy2iZ_YwwTWieOA7E20gKoBs-w


2019년 6월 23일 일요일

GMS2 zUI in Android 안드로이드 환경에서 ZUI 사용

Windows에서 주로 작업을 하다보니 Android 환경에서 의도한대로 동작이 안되는 현상이 있었습니다.

GUI 크기 문제

간혹 안드로이드에서 ZUI가 표시 안되는 경우가 있습니다. 확인해보니 gui영역이 생각했던 크기보다 큰 경우가 발생합니다. 임의의 room을 만들고 해당 room에 room creation code에 아래 내용을 넣어줍니다. 마지막에 room_goto_next()를 호출하여 우리가 원하는 room을 가도록 만들어 줍니다. 그리고 여기에서 WIDTH, HEIGHT 는 가로 세로이며, 크기는 원하는 크기로 넣어줍니다.

WIDTH = 480
HEIGHT = 320
if(os_type==os_android){
 //WIDTH = display_get_height()
 //HEIGHT = display_get_height()
}
window_set_size(WIDTH,HEIGHT)
surface_resize(application_surface,WIDTH,HEIGHT)
display_set_gui_size(WIDTH, HEIGHT);
room_goto_next();

Hover 문제


ZUI 는 hover가 된 Object에 대해서만 동작합니다. Step 이벤트에서 마우스를 지속적으로 감시하고 hover를 변경합니다.

objZUIMain 의 Step 이벤트

global.__zui_mx = device_mouse_x_to_gui(0);
global.__zui_my = device_mouse_y_to_gui(0);

zui_update_begin();
zui_update();

이것은 모바일 환경에서 불편을 만듭니다. 왜냐하면 마우스를 사용하지 않기 때문에 hover가 일어나지 않습니다. 그래서 버튼을 두번 눌러야지 동작을 하게됩니다. 이것을 개선하려면 클릭전에 hover 처리를 해주면됩니다.
zui 의 모든 object의 global left pressed 코드의 hover 처리가 있다면 위 코드를 한번더 실행하게 해줍니다.
이러한 처리는 상속을 받으므로서 쉽게 처리가 가능합니다.
objUIOneClickHoverParent object를 만들고 global left pressed 에 위 코드를 만들고 나머지 object 에 event_inherited(); 를 한줄 넣습니다.


윈도우 Close 버튼 없음

여러개의 윈도우가 있다면 당연히 우측 상단에 Close가 없으면 불편할겁니다. ZUI에는 없네요. 그러면 버튼 형태로 만들어서 넣으면 됩니다.

버튼과 비슷하나 Global Left Released 에 아래와 같이 zui_destory를 넣습니다. closeall 옵션에 따라 모든 윈도를 닫을지 현재 윈도우를 닫을지 결정 합니다.

Global Left Released 이벤트

if (pressed) {
 pressed = 0;
 if (zui_get_hover()) {
  if(closeall==true){
   with(zui_main()){
    zui_destroy()
   }
  }else{
   with(zui_get_parent()){
    zui_destroy()
   }
  }
 }
}

Draw 이벤트에서는 sprClose 이미지를 추가하였습니다. check box위에 X 표시를 추가한 이미지 입니다.
if (zui_get_hover()) {
 if (pressed)
  draw_set_color($cccccc);
 else
  draw_set_color($eeeeee); 
} else {
 draw_set_color($ffffff);
}

draw_sprite_ext(sprClose, 0, -1, -1, 1, 1, 0, draw_get_color(), 1);

if (value)
 draw_sprite_ext(sprClose, 1, -1, -1, 1, 1, 0, draw_get_color(), 1);
테스트 코드에 아래 코드를 넣습니다.
with (zui_create(400-20, 4, objUIClosebox)) {
 zui_set_anchor(0, 0);
}
앞에 인자는 좌표이므로 적당이 넣으면 됩니다.
objTestWindow의 Create 이벤트 입니다.
zui_set_size(400, 216);
 
with (zui_create(0, 0, objUIWindowCaption)) {
 caption = "Window";
 draggable = 1;
}

with (zui_create(400-20, 4, objUIClosebox)) {
 zui_set_anchor(0, 0);
}

with (zui_create(12, 38, objUIButton)) {
 zui_set_anchor(0, 0);
 zui_set_size(120, 32);
 caption = "Button 1";
 callback = test_callback_button;
}

with (zui_create(140, 38, objUIButton)) {
 zui_set_anchor(0, 0);
 zui_set_size(120, 32);
 caption = "Button 2";
 callback = test_callback_button;
}

with (zui_create(268, 38, objUIButton)) {
 zui_set_anchor(0, 0);
 zui_set_size(120, 32);
 caption = "Button 3";
 callback = test_callback_button;
}

실행화면


전체 소스


안드로이드용 apk


2019년 6월 22일 토요일

GMS2 zUI 분석


ZUI 소개

GMS에서 UI를 구현하는 extension ( Button, CheckBox , Slider, Label )
Free
깔끔한데 설명이 없어서 사용하기가 어렵습니다.

https://marketplace.yoyogames.com/assets/649/zui-engine


GMS2 에서 오류 발생 처리

test_callback_slider() 함수에서 오류발생함
발생 사유, argument0을 사용안해서 발생하는 현상, argument0 = argument0 부분 추가하여 오류 발생 하지 않도록 함.

argument0 = argument0
with (target) {
 __scalex = argument1 / 100;
 __scaley = argument1 / 100;
}

구성

script+object로 구성되며, 예제 코드로 제공되는 형태의 코드를 어디에서나 한번만 호출 하면 됩니다. 일반적으로 한번 호출이 필요하기 때문에 아래의 코드를 임의의 object의 create에 넣고, room에 object를 생성시키면 됩니다.

[Example Code]
  with (zui_main()) {
   with (zui_create(zui_get_width() * 0.5, zui_get_height() * 0.5, objUIWindow, -1)) {
    zui_set_size(400, 198);

    with (zui_create(0, 0, objUIWindowCaption)) {
     caption = "Window";
     draggable = 1;
    }

    with (zui_create(12, 38, objUIButton)) {
     zui_set_anchor(0, 0);
     zui_set_size(120, 32);
     caption = "Button 1";
     callback = test_callback_button;
    }

    with (zui_create(140, 38, objUIButton)) {
     zui_set_anchor(0, 0);
     zui_set_size(120, 32);
     caption = "Button 2";
     callback = test_callback_button;
    }

    with (zui_create(268, 38, objUIButton)) {
     zui_set_anchor(0, 0);
     zui_set_size(120, 32);
     caption = "Button 3";
     callback = test_callback_button;
    }

    with (zui_create(36, 170, objUICheckbox)) {
     zui_set_anchor(0, 0);
     value = 1;
    }

    with (zui_create(60, 170, objUISlider)) {
     zui_set_anchor(0, 0);
     zui_set_width(128);
     minimum = 4;
     maximum = 8;
     value = 6;
    }
   }
  }

예제 코드 분석

zui_main() 호출은 objZUIMain 을 생성합니다. 그리고 그 안에서 objUIWindow 를 생성하고, objUIWindowCaption 를 생성하면, 하나의 윈도우가 됩니다.
그리고 내부 안에는 어떤 컨트롤을 넣을지 결정하면 됩니다.
버튼이 눌리면 callback = test_callback_button; 이런식으로 스크립트 합수를 연결합니다. 인자로는 호출하는 id 값이 넘어 옵니다.

단점

UI가 많지 않습니다. List도 없습니다. 어디에 사용할 수 있을지 고민이 되지만, 이것을 참고하여 다른 ui형태를 만들 수 있습니다.
Window Close가 없습니다. 그래서, 필요시 zui_destroy 를 호출하면 모든 윈도우가 닫힙니다.


2019년 6월 15일 토요일

GMS2 Object Depth, Object 간 depth 출력


서론
GMS에서 여러개의 Object가 Draw될때 서로 겹치는 부분이 발생합니다. 겹치는 부분에 있어서 어떤 Object를 출력 할지 결정하는것이 이번 시간의 내용입니다.

Object의 출력을 Layer에 넣고 출력하면 될텐테 만약 같은 layer라면 출력 순서를 어떻게 정하면 될까요?

아래 동영상을 보면 이해하기가 쉽습니다.

https://youtu.be/rcMHwdvEDy0


이론은 간단
일반적으로 3차원에서는 Z축이 존재하고 Z-order 로 멀리있는것을 먼저 출력하게 됩니다.
2D에서는 일반적으로 정면 45도 각도 위에서 아래쪽을 내려다 보는 형태로 많이 제작하므로, 동일하게 멀리 있는것은 먼저 출력해주면 됩니다.
여기 예제에서는 Y축이 작을수록 위쪽에 위치해 있으므로 먼저 출력되도록 하면됩니다.

아래 그림에서 좌측은 원본이고, 우측이 원하는 결과 입니다.


구현 절차

0. object 생성

object0,1,2 와 object_draw(room에 sprite없이 추가), object_parent(draw object의 부모)

1. draw할 object 부모 설정

많은 코드가 중복되므로 중복을 막기 위해 부모 object_parent를 설정합니다.
자식은 object0, 1, 2 를 가집니다. 더 많은 object가 있다면 더 추가해도 됩니다.

2. object의 draw막기

object_parent 의 Draw 이벤트를 막습니다.
막는방법은 핸들러를 생성하기만 하면 됩니다.

3. draw 원하는 object 들의 정보를 모으기

원하는 정보는 Pre-Draw에서 모을 수 있습니다. pre-Draw 핸들러는 scr_addto_depthgrid() 스크립트를 호출 하도록 합니다. 이곳에는 object들을 grid에 모으는 역할을 합니다.

scr_addto_depthgrid() 스크립트
with(object_draw){
 if( !ds_exists(ds_depthgrid,ds_type_grid) ){
  //         objname, y
  // object
  
  // 2는  objname, y 2개 이기 때문에 
  // 1은 처음 만들어서 데이터가 없기 때문에
  ds_depthgrid = ds_grid_create(2,1)
  ds_grid_set(ds_depthgrid,0,0,other)
  ds_grid_set(ds_depthgrid,1,0,other.y)
 }else{
  gridheight = ds_grid_height(ds_depthgrid)
  // grid 크기 하나 더 늘림
  ds_grid_resize(ds_depthgrid,2,gridheight+1)
  ds_grid_set(ds_depthgrid,0,gridheight,other)
  ds_grid_set(ds_depthgrid,1,gridheight,other.y)
 }
}

ds_grid_create grid를 만듭니다. grid는 2차원 배열입니다.
ds_grid_set 는 grid특정 위치에 값을 넣습니다.
ds_grid_height grid의 높이를 구합니다.
ds_grid_resize gird크기를 변경합니다.

object_draw에 멤버로 있는 gird인 ds_depthgrid를 생성하여 object들을 하나씩 넣습니다. 이때 y값도 같이 넣습니다. 만약 메모리가 부족하다면 gird크기를 하나씩 증가시킵니다.

4. 모은 정보를 이용하여 Y축결과로 sort하기

모아진 gird는 object_draw라는 object의 멤버 grid로 모아집니다. 그래서 create 이벤트에 ds_depthgrid=0 값을 추가 하도록 합니다.
그리고 나서 draw 핸들러에서 Y값 기반으로 sort를 합니다.
ds_grid_sort(ds_depthgrid,1,true)

5. sort된 결과로 draw를 한꺼번에 하기

object_draw Draw 핸들러
if(ds_exists(ds_depthgrid,ds_type_grid)){

 ds_grid_sort(ds_depthgrid,1,true)
 
 dsheight = ds_grid_height(ds_depthgrid)
 for( i=0;i<dsheight;i++){
  instance = ds_grid_get(ds_depthgrid,0,i)
  with(instance){
   draw_self()
  }
 }
 
 ds_grid_destroy(ds_depthgrid)
}

정렬된 grid에서 ds_grid_get을 이용하여 저장된 object를 꺼내서 draw_self()하게되면 이미지가 draw됩니다.

6. 누수 방지

마지막으로 Destory에는 메모리 누수 방지를 위해서 메모리 해제 코드를 한번 더 추가합니다.
object_draw Destory 핸들러
if(ds_exists(ds_depthgrid,ds_type_grid)){
 ds_grid_destroy(ds_depthgrid)
}


7. 테스트를 위한 처리

object2에 키보드 조작을 위한 step핸들러 추가

if keyboard_check(vk_left){
 x=x-1
}

if keyboard_check(vk_right){
 x=x+1
}

if keyboard_check(vk_up){
 y=y-1
}

if keyboard_check(vk_down){
 y=y+1
}