https://github.com/anthonymoralez/lime-tutorials/tree/master/tutorial-02
http://lime.outlawgametools.com/tutorials/02-taking-advantage-of-properties/
02 – Taking Advantage of Properties (프로퍼티의 이점 가지기)
Difficulty: Beginner 초보자가
Duration: 20 minutes 20분걸린다고 하네요.
Description:
Properties
allow you to create all kinds of gameplay, for instance perhaps you
wanted to have health pickups in your game you could do so by adding
a “healthBonus” property to your tile with a value of “50”.
To
keep Lime as generalised as possible I have decided to not implement
any game specific features so in order to actually take advantage of
properties you will have to write the code to deal with them.
I
will be releasing tutorials over time that provide sample code for
using properties in lots of interesting ways so stay tuned.
Step 1: Understanding what a property is(프로퍼티가 무엇인지 이해하기)
A
property is simply a pair of data items, a Name and a Value.
Everything in Tiled can have as many properties as you like. Possible
uses are that you could give your Map a property that holds the level
name or you could give a tile a property to be used as a health
pickup.
프로퍼티는 데이터 아이템의(이름과 값으로 구성된) 쌍입니다.
Step 2: Adding a property (프로퍼티 추가하기)
In
this tutorial we will add a tile property just to show it working,
but I will also list how to add properties to everything else as
well.
With
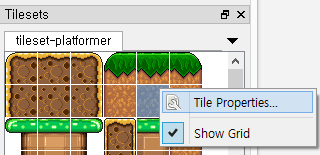
your map loaded up in Tiled you can add a property to a tile by right
clicking it in the tileset and select Tile Properties… to
bring up the Property window:
Now
simply set a Name and Value for each property you want to add, I have
just created one but you can create as many as you like:
With
your property created make sure to add atleast one of those tiles to
your map and then save it.
Please
note that due to a bug
in Tiled on
OSX it is vital that you press enter when you have entered your new
property before pressing the Ok button.
프로퍼티 추가하는 방법이 그림과 영어 설명과 다릅니다.
tilesets 윈도우에서 오른쪽 버튼 누르면 프로퍼티창에서 현재 프로퍼티가 나오는데 그냥 왼쪽이나 오른쪽이나 찍어도 프로퍼티 윈도우가 나타납니다.
추가하려면 +버튼을 눌러서 추가합니다. 별로 어렵지 않습니다. 해보시기 바랍니다.
Step 3: Using the property in your game(게임에서 프로퍼티 사용하기)
In
this tutorial I will show a very basic, and pretty boring, use for
properties however you will get an understanding of how they work and
one of the ways you can access them while in later tutorials we will
see more interesting things we can do with them.
Firstly
you will need to load up your map as we did in the first
tutorial and
then get access to the tile layer that your new tile is on:
앞에서 사용한 예제에서 아래 코드를 추가 해서 넣으면 됩니다.
local
 layer = map:getTileLayer("Tile Layer 1")
With
your layer stored off you can now get a list of all tiles that are on
it like so:
local
 tiles = layer.tiles
What
we now need to do is simply loop through all the tiles printing off
any properties they have, like this:
--
  Loop through our tiles
for
  i=1, #tiles, 1 do
--
  Get a list of all properties on the current tile
local
  tileProperties = tiles[i]:getProperties()
--
  Loop through the properties, if any
for
  key, value in pairs(tileProperties) do
--
  Get the current property
local
  property = tileProperties[key]
--
  Print out its Name and Value
print(property:getName(),
  property:getValue())
end
end
With
the code saved just run your game, you will see something similar to
the following in the Terminal:
결과가 화면으로 나오는건 아니고 터미널에 나타나게되는데, tiled 버전이 달라서 그런지 기본적으로 tile들이 property를 가지고 있어서 정보가 많이 나옵니다. 아래결과 화면처럼 나오지는 않고,
...생략...
index 801
message Hello, World
index 802
...생략...
즉 타일 하나마다 index 번호 property를 가지고 있고 사용자가 추가한 프로퍼티도 가지게 됩니다.
프로퍼티를 추가하고 게임에서 읽는 방법에 대한 예제입니다.
꼭 알아두세요.
1. lime은 프로젝트 최상위 폴더에 lime폴더 통째로 복사해서 넣습니다.
2. Layer는 높은쪽이 위쪽 레이어입니다.
3. Tiled에서 tileset의 프로퍼티는 이름과 값으로 구성됩니다.
1. lime은 프로젝트 최상위 폴더에 lime폴더 통째로 복사해서 넣습니다.
2. Layer는 높은쪽이 위쪽 레이어입니다.
3. Tiled에서 tileset의 프로퍼티는 이름과 값으로 구성됩니다.


댓글 없음:
댓글 쓰기