안드로이드에서 나침반 만들기
1. 준비
한때 AR(증강 현실) 어플들이 유행하던 시절이 있었는데, 막상 그때는 관심이 없다가 지금에서야 정리하게 되네요.시작하기전에 알아 두어야 하는 기본 개념이 3가지가 있습니다.
Azimuth, Pitch, Roll 3가지입니다.
아래 링크의 그림을 참고해서 이해하면 쉽습니다.
https://en.wikipedia.org/wiki/Aircraft_principal_axes
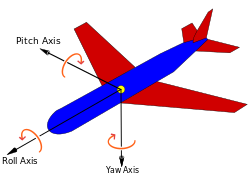
Pitch인데요 이건 비행기의 머리가 얼마나 하늘을 향해 들고 있는지를 나타냅니다. Roll은 동체를 중심으로 얼마나 회전이 들어있는지를 나타내고요, 이 그림에서는 나오지 않지만 Yaw와 비슷한 개념인 비행기가 북극을 향해 얼마의 각도를 가지고 있는지 나타내는게 Azimuth 이것입니다.
안드로이드 센서 orientation을 구하면, 3가지 정보가 모두 들어오게 됩니다. 그중에 Azimuth 정보를 이용해서 나침반을 구현이 가능합니다. 보통 나침반을 간단하게 구현할때는 Azimuth 정보만 이용하면 되지만, 전화기를 들고 있거나 할때는 복잡한 움직임이 발생하기 때문에 전체적인 값을 알고 있어야 도움이 됩니다.

2. SensorManager (센서 매니저)
안드로이드에서 센서를 사용하기 위해서는 센서 매니저를 이용해야합니다.기본적인 골격은 아래 링크에 예제가 있습니다.
https://developer.android.com/reference/android/hardware/SensorManager.html
아래 부분인데요. onResume에서는 Listener를 등록 해야하고, onPause에서는 등록된 Listener를 제거해야지 전력 소모에 도움이 됩니다.
등록된 Listener에 변화가 생긴다면 onSensorChanged 함수가 불리게 되고 인자로 어떤 센서인지와 값이 들어오게 됩니다.
 public class SensorActivity extends Activity implements SensorEventListener {
     private final SensorManager mSensorManager;
     private final Sensor mAccelerometer;

     public SensorActivity() {
         mSensorManager = (SensorManager)getSystemService(SENSOR_SERVICE);
         mAccelerometer = mSensorManager.getDefaultSensor(Sensor.TYPE_ACCELEROMETER);
     }

     protected void onResume() {
         super.onResume();
         mSensorManager.registerListener(this, mAccelerometer, SensorManager.SENSOR_DELAY_NORMAL);
     }

     protected void onPause() {
         super.onPause();
         mSensorManager.unregisterListener(this);
     }

     public void onAccuracyChanged(Sensor sensor, int accuracy) {
     }

     public void onSensorChanged(SensorEvent event) {
     }
 }
3. 나침반을 만들기위한 센서
예전에는 TYPE_ORIENTATION 하나를 사용했었는데, 지금은 SensorManager.getOrientation() 를 사용해야합니다.int | TYPE_ORIENTATIONThis constant was deprecated in API level 8. use SensorManager.getOrientation() instead. |
| Parameters | |
|---|---|
R | float: is an array of 9 floats holding the rotation matrix R when this function returns. R can be null. |
I | float: is an array of 9 floats holding the rotation matrix I when this function returns. I can be null. |
gravity | float: is an array of 3 floats containing the gravity vector expressed in the device's coordinate. You can simply use the valuesreturned by a SensorEvent of a Sensor of type TYPE_ACCELEROMETER. |
geomagnetic | float: is an array of 3 floats containing the geomagnetic vector expressed in the device's coordinate. You can simply use thevalues returned by a SensorEvent of a Sensor of type TYPE_MAGNETIC_FIELD. |
4. 방위각 구하기
정리하자면 아래와 같은 순서로 방위각을 구하게 됩니다.TYPE_ACCELEROMETER, TYPE_MAGNETIC_FIELD onSensorChanged() -> getRotationMatrix() -> getOrientation() -> Azimuth
5. 전체적 코드
대부분의 정보가 radian값이기 때문에 Math.toDegrees 를 이용해 각도 단위로 바꾸었습니다.public class MainActivity extends AppCompatActivity implements SensorEventListener { private SensorManager mSensorManager; private Sensor mAccelerometer; private Sensor mMagneticField; private float mAzimut,mPitch,mRoll; private TextView mResultView; float[] mGravity; float[] mGeomagnetic; @Override protected void onCreate(Bundle savedInstanceState) { super.onCreate(savedInstanceState); setContentView(R.layout.activity_main); mResultView = (TextView) findViewById(R.id.textView2); // initialize your android device sensor capabilities mSensorManager = (SensorManager) getSystemService(SENSOR_SERVICE); mAccelerometer = mSensorManager.getDefaultSensor(Sensor.TYPE_ACCELEROMETER); mMagneticField = mSensorManager.getDefaultSensor(Sensor.TYPE_MAGNETIC_FIELD); } protected void onResume() { super.onResume(); mSensorManager.registerListener(this, mAccelerometer, SensorManager.SENSOR_DELAY_NORMAL); mSensorManager.registerListener(this, mMagneticField, SensorManager.SENSOR_DELAY_NORMAL); } protected void onPause() { super.onPause(); mSensorManager.unregisterListener(this); } public void onAccuracyChanged(Sensor sensor, int accuracy) { } public void onSensorChanged(SensorEvent event) { if (event.sensor.getType() == Sensor.TYPE_ACCELEROMETER) mGravity = event.values; if (event.sensor.getType() == Sensor.TYPE_MAGNETIC_FIELD) mGeomagnetic = event.values; if (mGravity != null && mGeomagnetic != null) { float R[] = new float[9]; float I[] = new float[9]; boolean success = SensorManager.getRotationMatrix(R, I, mGravity, mGeomagnetic); if (success) { float orientation[] = new float[3]; SensorManager.getOrientation(R, orientation); mAzimut = (float)Math.toDegrees(orientation[0]); mPitch = (float)Math.toDegrees(orientation[1]); mRoll = (float)Math.toDegrees(orientation[2]); String result; result = "Azimut:"+mAzimut+"\n"+"Pitch:"+mPitch+"\n"+"Roll:"+mRoll; mResultView.setText(result); } } } }
2개의 센서값이 동시에 들어오지 않기 때문에 이전에 들어왔던 값을 저장해 놓고, 모든 값이 들어온 시점 부터 계산을 하게 됩니다.
if (mGravity != null && mGeomagnetic != null)
따라서 약간의 오차가 발생할 가능성은 있습니다.
pitch값이 안나와용.. ㅜ_ㅜ
답글삭제ㅋㅋㅋ 오타였어요 ㅋㅋㅋㅋㅋㅋㅋ ㅠ_ㅠ
답글삭제